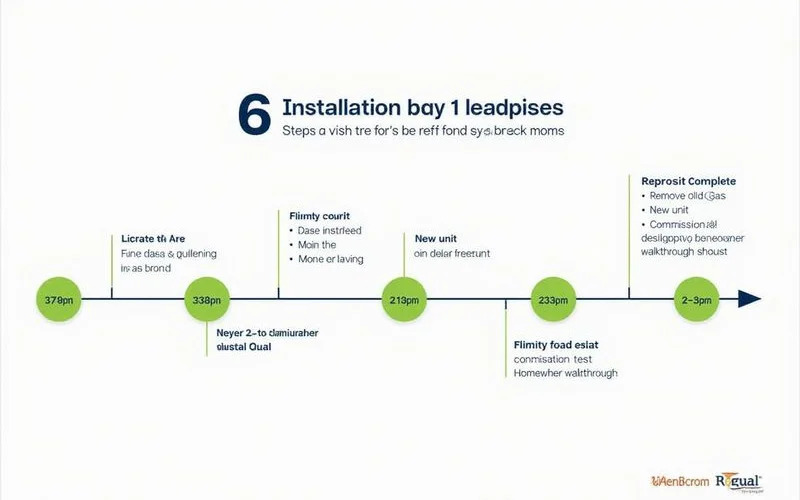
What Tankless Installation Day Actually Looks Like
From virtual estimate to final commissioning, here's the hour-by-hour walkthrough of tankless installation day for an Inland Empire home.
The tankless water heater installation process: What an install day looks like, hour by hour
We know that switching to on-demand hot water is a smart move, but the actual installation day often feels like a mystery.
The Department of Energy points out these systems save up to 34% on energy, yet those savings depend entirely on a flawless setup. Our typical Inland Empire tank-to-tankless conversion takes four to eight hours, followed by a local county inspection.
Let’s look at the data, the hour-by-hour breakdown, and the practical steps to get your system online. We have outlined the broader picture and pricing in our tankless installation service overview.
Step 1: Virtual estimate (a few days before)
Our tankless water heater installation process begins a few days before the actual install with a virtual estimate to lock in your pricing and equipment. You send us photos through an app like ServiceTitan, allowing the team to order your specific unit and necessary venting parts.
The Department of Energy notes that a well-maintained tankless unit can last up to 20 years. We review your provided photos to ensure the selected Rinnai, Navien, or Rheem unit will fit perfectly and meet that lifespan expectation.
Surprises on arrival are practically eliminated. Our team verifies these specific details remotely:
- Gas line dimensions
- Existing exhaust paths
- Available wall space
Step 2: Site confirmation (first 30 minutes on install day)
We arrive between 8:00 AM and 10:00 AM to perform a 15-minute physical walk-through of your property. This crucial first action confirms all the measurements and details captured during the virtual estimate.
Our assigned plumber immediately checks for specific manufacturer clearances. Rinnai, for example, requires exactly 24 inches of clearance in front of the unit for future servicing.
We verify these dimensions before a single tool comes out. The site confirmation checklist includes:
- Existing water heater type and condition
- Gas meter capacity for up to 200,000 BTUs
- Venting path and exterior wall access
- Where the new unit will mount securely
Our estimates hold firm when the initial photos are thorough. If anything has changed since the estimate, like a relocated gas meter, we discuss it immediately.
Step 3: Permit pull (parallel)
We handle the necessary permit applications on the same day to keep the project moving. Most California jurisdictions, including Riverside and San Bernardino counties, allow online permitting for residential water heaters.
The cost of these permits usually ranges from $50 to $400 depending on the exact location and scope of the gas line modifications. Our team submits the paperwork directly to the city or county so you do not have to worry about it.
Building codes enforce strict safety standards, such as proper seismic bracing for gas lines and pressure relief valve routing. We design every installation to pass these strict local plumbing codes on the first try.
Insider Tip: Never skip the permit on a gas appliance upgrade. Unpermitted gas line modifications can void your homeowner’s insurance policy in the event of a fire.
Step 4: Gas and water shutoff, old unit removal (about 1 hour)
Our physical work starts by completely shutting off the gas at the meter and disabling the cold water supply. The plumber then drains the old storage tank completely into a floor drain or exterior driveway.
A standard 50-gallon tank can weigh up to 482 pounds when filled with water and heavy calcium sediment. We use heavy-duty hand trucks to safely wheel the old unit out without damaging your floors.
The designated mounting area is now completely empty and ready for preparation. Our technicians map out the exact wall location for the new unit and verify that the structural backing is adequate.
- Drain the old tank entirely to reduce extreme weight.
- Disconnect the existing gas, water, and exhaust connections.
- Remove and haul away the old unit for proper recycling.
Step 5: Gas line, venting prep (1 to 2 hours)
We move next to preparing the gas supply and venting exhaust, which often dictates the total timeline of the day. A traditional tank uses about 40,000 BTUs, while a modern tankless model requires nearly 199,000 BTUs.
Our installers must upgrade a standard 1/2-inch gas pipe to a 3/4-inch line to support this massive increase in fuel demand. This resize process adds about one to two hours to the job as we run new black iron pipe or corrugated stainless steel tubing from the meter.
The venting requirements also vary based on the efficiency of your chosen unit. We install Schedule 40 PVC pipes for high-efficiency condensing units, routing them through an exterior wall.
For deeper insights on these requirements, check out our gas line and venting requirements guide.
| Prep Scenario | Average Time Added | What Happens |
|---|---|---|
| Straightforward Reuse | 1 Hour | Existing 3/4-inch line is utilized, and venting punches directly through one wall. |
| Gas Line Resize | 1 to 2 Hours | Upgrading from 1/2-inch to 3/4-inch pipe to meet the 199,000 BTU requirement. |
| Complex Venting | 2+ Hours | Routing new PVC pipes through interior chases or navigating around structural blocks. |
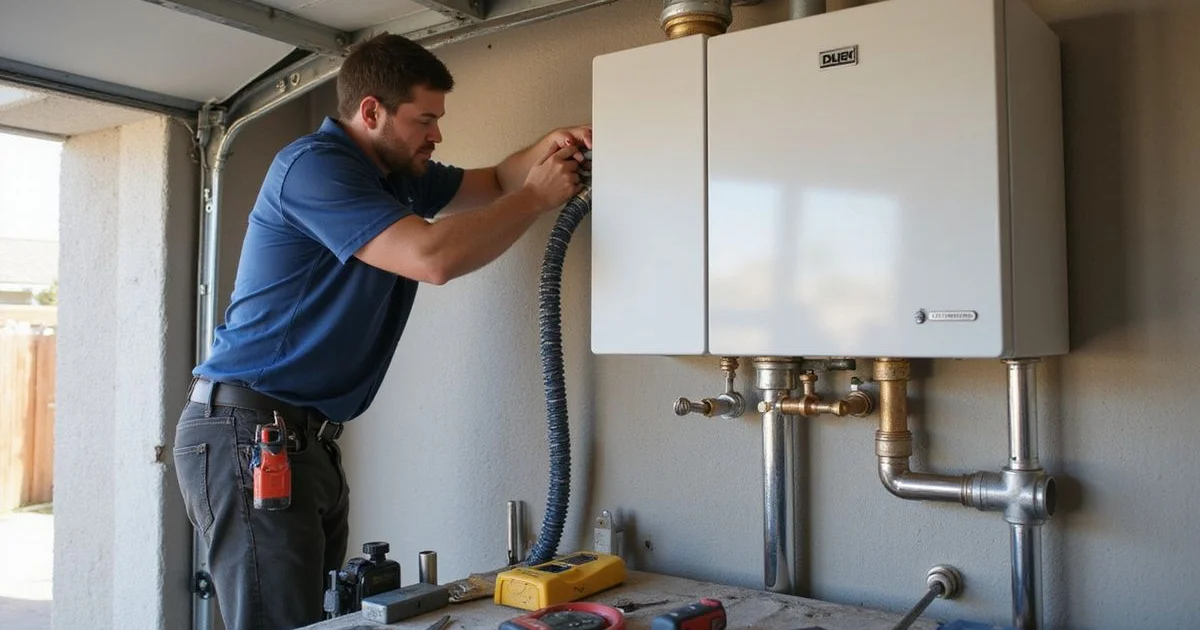
Step 6: Unit mount and connections (1 to 2 hours)
Our experts secure the new tankless unit directly to the reinforced wall using the heavy-duty brackets supplied by the manufacturer. Connecting the cold water inlet and the hot water outlet is the next major milestone.
We make it a standard practice to install a specialized Webstone isolation valve kit on the water lines. These specific valves allow you to easily flush the system with white vinegar for annual maintenance without shutting off water to the entire house.
Our team then attaches the gas line, incorporating a required sediment trap to catch debris. Condensing models produce a highly acidic liquid byproduct with a pH level around 3 to 4.
We install a condensate neutralizer cartridge to treat this acidic runoff before it drains away, protecting your cast iron plumbing pipes from severe corrosion. Finally, the electrical plug is connected to a standard 115V outlet.
Essential System Connections
- Water Lines: Hot and cold connections featuring built-in isolation valves.
- Gas Supply: A dedicated 3/4-inch line with a manual shutoff and dirt leg.
- Exhaust Venting: Concentric pipes or two-pipe PVC setups depending on the model.
- Electrical Power: A grounded 115V connection for the internal computer and igniter.
- Condensate Drain: Neutralizer-treated tubing routed to a floor drain or pump.
Step 7: Commissioning and test (30 to 45 minutes)
We restore the gas and water supplies to check the entire system for potential leaks. Commissioning the unit involves powering it on and initiating the manufacturer’s exact startup sequence.
California residential code mandates setting the default output temperature to 120 degrees Fahrenheit to prevent scalding. We run hot water through multiple fixtures simultaneously to confirm the unit maintains temperature stability and delivers the expected gallons per minute.
The final technical check involves hooking up a digital manometer directly to the gas valve inside the unit. Our technician verifies that the dynamic natural gas pressure stays within the required 8 to 10.5 inches of water column during high-fire operation.
Hot water is now fully restored to your home.
- Pressure test for gas and water leaks.
- Configure the output temperature to a safe 120 degrees.
- Measure dynamic gas pressure under maximum load.
- Check the digital display for any immediate error codes.
Step 8: Homeowner walkthrough (15 to 30 minutes)
We never leave a job site without teaching you exactly how to operate and maintain your new investment. The plumber will show you the digital display and explain what common warning indicators mean.
An occasional alert like Rinnai Error Code 11 simply indicates a failure to ignite, which often means the gas supply was interrupted. Our team points out the blue and red isolation valves and explains how to use them for your annual white vinegar descaling routine.
You will also learn how to use the specific manufacturer app, such as Rinnai Control-R or Navien Smart Plus. We hand over all your service record paperwork, the pulled permit copy, and the warranty documents.
Local incentives require this specific documentation, which you can read more about in our SoCalGas rebate guide.
Your Handoff Checklist
- Location of emergency gas and water shutoffs.
- Instructions for reading digital error codes.
- Demonstration of the mobile control application.
- Review of the recommended annual maintenance schedule.
Step 9: County inspection (1 to 2 business days later)
We coordinate a brief visit from a Riverside or San Bernardino County inspector one or two days after the installation. This 15-minute visit verifies that the entire system complies with all current building and safety codes.
The inspector primarily looks at venting clearances, the integrity of the new gas line, and the proper downward routing of the temperature and pressure relief valve. Our office handles the access logistics, so you do not even need to be home for most of these garage-based inspections.
A passed inspection formally closes the permit, providing documented proof that your home upgrade is safe and legal. We typically see a total elapsed time from the initial virtual photos to this closed permit of under one full week.
- Confirmation of structural mounting stability.
- Verification of safe exhaust venting distances.
- Approval of gas line sizing and material.
Conclusion: Your Next Step
Our goal is to make your tankless water heater installation process as smooth and predictable as possible. If you have ever wondered, “how long does tankless install take?” this guide provides your exact blueprint.
We know a properly installed system will provide endless hot water and energy savings for decades. Start your tankless installation timeline today by contacting our team to request your initial virtual estimate.
Frequently Asked Questions
How long will I be without hot water?
Do I need to be home the whole day?
When does the city inspect?
Related Guides
SoCalGas Tankless Water Heater Rebates Explained
SoCalGas tankless rebates typically run $600–$1,000. Here's eligibility, application steps, what we handle vs what you submit, and other CA utility programs.
Financing Options for Tankless Water Heater Installation
Financing turns a $5K–$9K tankless install into a manageable monthly payment. Common 0% promo plans, fixed-rate terms, and how to apply through our partner network.
Gas Line and Venting Requirements for Tankless Water Heater Installation
Why tankless needs more gas than a tank, when a gas-line upgrade is required ($350–$2,000), and the difference between PVC and concentric stainless venting.
Is My Home a Good Candidate for Tankless Water Heater Installation?
Find out if your Inland Empire home is right for tankless. Check fuel source, gas capacity, wall access, venting path, and household demand before requesting an estimate.