Is Your Home a Good Candidate for Tankless?
Find out if your Inland Empire home is right for tankless. Check fuel source, gas capacity, wall access, venting path, and household demand before requesting an estimate.
The five-minute self-qualification check
You know how hard it is to figure out if a new appliance will actually fit your current setup. The transition to an on-demand system often seems complicated, but it usually comes down to a few basic utility checks. We hear property owners ask constantly, is my home a good candidate for tankless? This question drives our entire initial assessment process.
Our tankless installation service handles the full evaluation. You can still do the initial screening yourself. A flashlight and a phone camera provide everything you need to start.
We consider five main criteria for a practical switch. Missing a few marks just means a slightly more involved project.
Let’s look at the specific tankless home requirements, what the data actually tells us, and how to verify your setup today.
1. Fuel source: gas is the default
Natural gas service is the cleanest path to a tankless install in the Inland Empire. Roughly 90 percent of local homes have it.
Our technicians check your existing fuel connections first. The local infrastructure heavily favors gas. We usually rely on SoCalGas for this region. They cover over 5.9 million meters and 21 million consumers.
Our research highlights a 2024 report showing SoCalGas energy efficiency programs saved customers $95 million. This track record makes natural gas a highly cost-effective choice. We find that all-electric homes face steeper upfront costs. A 200-amp panel upgrade for an electric tankless water heater averages $1,500 to $3,500 in 2026.
Can I install tankless in my home if I don’t have natural gas? Review these common alternatives:
- Natural Gas: The most common option, highly efficient, and eligible for local rebates.
- Propane: An excellent choice for homes outside the main gas service areas. Most major brands offer propane-rated versions.
- Electric: Requires a major electrical panel load calculation. The required 200-amp service upgrade costs easily push $3,500 before the heater is even purchased.
2. Gas line capacity
Most older homes have a 1/2-inch gas line sized for a 40,000 BTU tank. A modern tankless unit draws between 140,000 and 199,000 BTU at full burn.
Our crews often need to upgrade this undersized line. The typical fix involves running a 3/4-inch gas line from the meter or manifold to the unit location. We see 2026 costs for this work averaging $15 to $25 per linear foot. A complete line upgrade usually creates a total project cost ranging from $350 to $2,000.
Our gas line and venting guide walks through the specifics. It helps to understand exactly what materials plumbers use for different sections of the house.
| Pipe Material | Common Use Case | Key Benefit |
|---|---|---|
| Polyethylene (PE) | Underground exterior runs | Highly resistant to soil corrosion and moisture. |
| Black Iron | Interior structural runs | Durable and standard for indoor gas routing. |
| CSST (Corrugated Stainless) | Complex indoor paths | Flexible design drastically reduces elbow fittings. |
We check your current trunk line during the estimate. A properly sized existing system with multiple gas appliances might handle the draw without any new piping.
3. Wall access for mounting
Tankless water heaters mount directly to a wall. The unit footprint is roughly the size of a briefcase, but you must provide specific clearance space for safety and maintenance.
Our installers look for a dedicated, flat mounting surface. You cannot simply mount these heavy units to bare drywall without proper stud support. We strictly follow manufacturer guidelines for every install. A top-tier unit like the Navien NPE-A2 requires exactly 12 inches of clearance on the sides.
Our teams also ensure 6 inches of clearance above and 12 inches below the unit. This spacing allows technicians to perform necessary annual maintenance and access the water valves.
Best-case locations
- Exterior garage wall: This allows straightforward venting through the wall, easy gas line routing, and ideal service access.
- Interior garage wall: This placement requires slightly more venting work but remains highly effective.
- Utility closet on an exterior wall: This is common in single-story homes and works well if there is adequate clearance.
Locations that complicate the install
- Crawlspaces: These areas present a high freeze risk, poor access, and strict code clearance issues.
- Attics: Roof spaces introduce severe condensate drainage and vertical venting complications.
- Interior closets: Rooms with no exterior wall nearby demand long venting runs that significantly add to the final cost.
4. Venting path
Condensing tankless units use PVC piping, while non-condensing units require stainless steel. You need a clear path from the unit to the exterior, usually through a short horizontal run or a vertical chase.
Our designers aim for under 10 feet of straight run with a single 90-degree elbow. Long runs through finished interior spaces quickly drive up material and labor costs. We completely remove old water heater B-vent pipes during the conversion. The exhaust temperatures and condensate handling rules are entirely different for modern systems.
Safety Warning: Never use standard PVC on a non-condensing heater. A non-condensing unit exhausts gases at nearly 400°F, which will instantly melt standard PVC piping and cause a severe carbon monoxide hazard.
Our experts carefully calculate equivalent vent lengths based on 2026 manufacturer specifications. For example, units like the Navien NPE-A2 allow 2-inch PVC runs up to 75 feet. We must subtract 8 feet of capacity for every 90-degree elbow added to the path.
5. Household demand vs unit sizing
Right-sizing the gallons per minute (GPM) to your real demand is critical for consistent performance. We calculate this capacity using your local groundwater temperature and peak usage times.
Our regional data shows Inland Empire groundwater sits around 55°F to 60°F year-round. This mild starting temperature means you only need a 60°F to 65°F temperature rise to hit a comfortable 120°F shower output. We find that a standard 180,000 to 199,000 BTU gas model easily handles this required lift.
Here is the rough GPM math based on that specific temperature rise:
- 1 bathroom, 1 to 2 adults: 6 to 7 GPM unit.
- 2 bathrooms, 2 to 3 occupants: 7 to 8 GPM.
- 3 bathrooms, 3 to 4 occupants: 9 GPM.
- 4 bathrooms, larger household: 10 to 11 GPM condensing unit.
Our sizing process prioritizes your real usage patterns over simple bathroom counts. Undersized units run cold mid-shower during simultaneous demand. We ensure you do not waste money on an oversized, high-BTU rating you never actually use.
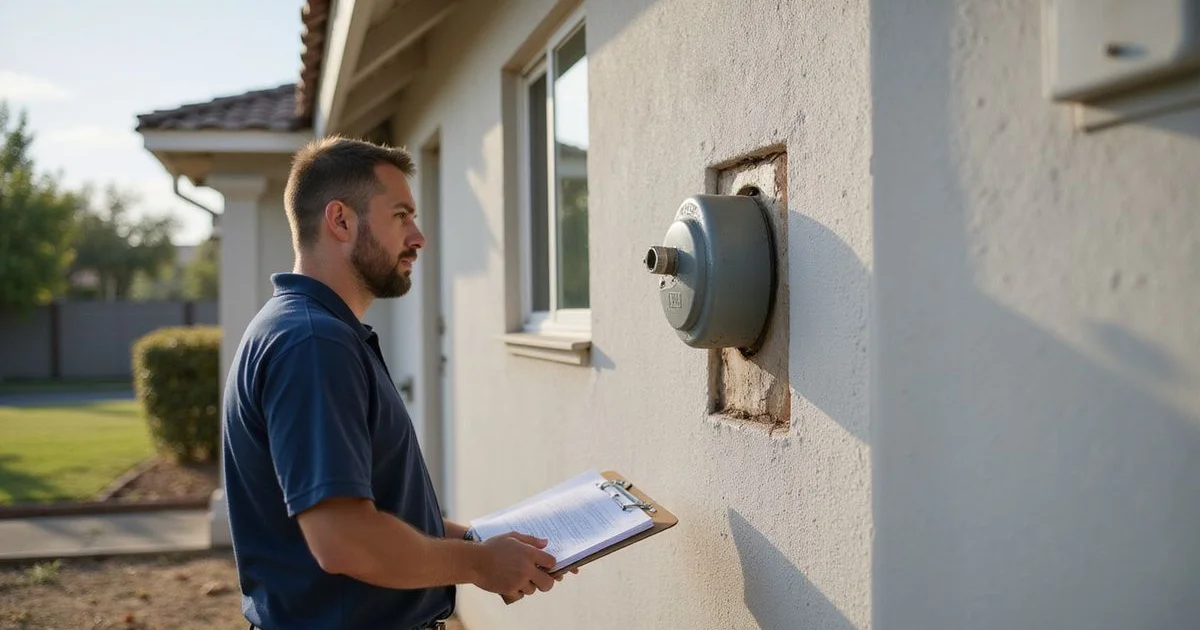
What we look for in your photos
Five clear photos usually provide enough detail to confirm your candidacy and produce a real quote. You can easily text or email these straight from your phone.
Our virtual estimate team uses these pictures to map out the entire project before arriving. A well-lit set of photos saves everyone an unnecessary initial trip. We need you to capture these specific angles:
- The existing water heater from the front, plus a wide shot showing the surrounding space.
- The gas meter and the pipe leaving it.
- The proposed install wall, if different from the current location.
- The path from the unit location to the nearest exterior wall for venting.
- The home’s electrical panel, which is crucial if recirculation is being added.
Our top pro-tip is to take a close-up photo of the electrical panel’s main breaker label. This small detail confirms your home’s total amperage capacity right away. We also recommend making sure the gas meter photo clearly shows the pipe size leaving the meter.
If your situation involves a crawlspace install or complex venting, we will tell you straight. Sometimes the smartest financial answer is simply staying with a traditional tank. Reach out to our team today to review your photos and discuss the best path forward.
Frequently Asked Questions
Can I install a tankless if I only have electric service?
Does an attic install work?
Can a tankless go on a crawlspace install?
Related Guides
SoCalGas Tankless Water Heater Rebates Explained
SoCalGas tankless rebates typically run $600–$1,000. Here's eligibility, application steps, what we handle vs what you submit, and other CA utility programs.
Financing Options for Tankless Water Heater Installation
Financing turns a $5K–$9K tankless install into a manageable monthly payment. Common 0% promo plans, fixed-rate terms, and how to apply through our partner network.
Gas Line and Venting Requirements for Tankless Water Heater Installation
Why tankless needs more gas than a tank, when a gas-line upgrade is required ($350–$2,000), and the difference between PVC and concentric stainless venting.
Tankless Water Heater Installation Cost in California
Real California tankless installation prices. First-time conversion: $5K–$9K. Tankless-to-tankless replacement: $3K–$5.5K. What drives the variation and how to read a quote.